Full Size Digital Download (suitable for printing at up to 9″ x 12″) Available for $6.00
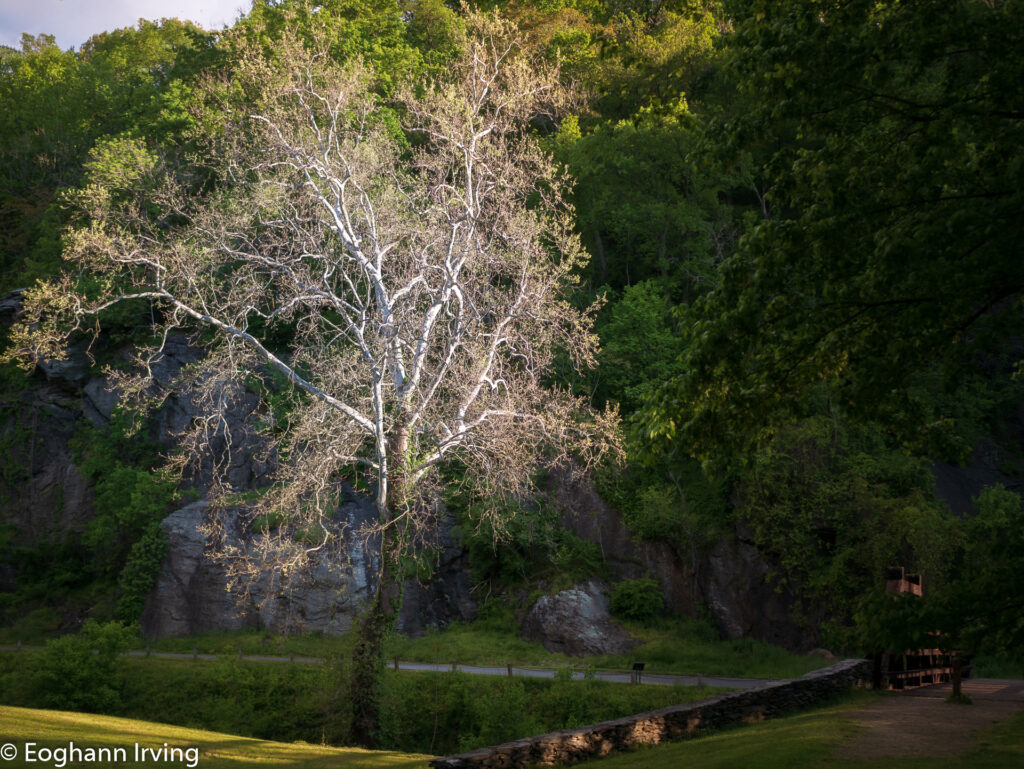
These two trees in Harpers Ferry near the Virginius Island bridge have become favorite targets for my photography lately. It’s the contrast of the white against it’s surroundings that I love. Particularly if I catch it at the right time in the morning when the sun directly hits the tree, then it’s almost as though the tree has an internal light.

I’ve tried different angles and styles, this time out I went for a more edited and less naturalistic look. In this case I think the starting image was a strong, one but there was room for improvement, because it didn’t evoke what I felt when I was standing there. The first step (and often last) in my editing process is always Lightroom.
At a minimum for any photo I’m going to do some whole image adjustments. Just some basic tweaking of the exposure, color balance etc. In this case I warmed what seemed like a visually cold image to reflect the sunlight that was streaming into the clearing. That alone can really change the tone of a photo. Plus a little nudge of the Shadows slider brought out some of the hidden detail in the photo. But the real fun comes when you start applying local edits and my favorite tool for that is Lightroom’s radial filters. In this case I used two radial filters of slightly different sizes, but both centered over the tree.

The first filter created a vignette effect by darkening the edges of the the image, which helps to focus the viewer’s attention on the tree in the image. The second, and smaller, radial filter was designed only to affect the tree itself. I achieved that by using the Luminence mask feature so that my area of effect was only the brightest parts of the image inside the circle. I nudged the highlights down a little because the sun was so bright against the tree and made the color tones a little colder because I wanted to keep the almost “blue” whiteness of the tree vs the yellow light elsewhere. I also decreased the Clarity slider while increasing Texture and Contrast. This combination accentuates the details while creating a slight blurring around the edges.
Then it was back to whole image edits to reduce Vibrance a bit. For the most part I prefer Vibrance to Saturation as it has a more subtle impact. Those simple changes made a huge difference to the feel of the image as you can see, making it much more inviting. But I couldn’t quite get the effect I wanted, plus there were some distracting elements. So imported the image with my current edits into Photoshop

The first an most important edits I made in Photoshop were to remove the annoying branches that were hanging into the scene. I’d tried to compose around them on site but couldn’t find a satisfactory angle. Nor could I figure out a crop that would work, so Photoshop’s amazing spot healing brush tool saved the day.
The final step then was to apply my Orton Effect action macro to give an even dreamier an more magical look to the final image. No doubt some will prefer a more naturalistic look but that wasn’t what I was going for here.
And yes I’m referencing Tolkien again!
Tall ships and tall kings
Three times three.
What brought they from the foundered land
Over the flowing sea?
Seven stars and seven stones
And one white tree.J.R.R. Tolkien
Full Size Digital Download (suitable for printing at up to 9″ x 12″) Available for $6.00
Discover more from Veristopia
Subscribe to get the latest posts sent to your email.