If we’re talking about the mechanics of taking a good photograph, and putting aside for now artistic merits, then the thing that everyone needs to learn about is exposure. Inside the camera there are three settings you can adjust that will control exposure and they are commonly referred to as the Exposure Triangle:
- Shutter Speed
- Aperture
- ISO
What is Exposure?
In the simplest of terms Exposure is the amount of light that reaches your camera’s sensor and as a result it’s how light or dark your photo will turn out to be. Having the correct exposure for your image will make a huge difference to its quality. If your photo is over-exposed then it will look washed out, if it is under-exposed it will be so dark that you can’t see most of the details. The precise amount of exposure is different for every single image.
Sometimes you may want an image to be mostly dark, say if you’re photographing silhouettes. Other times, perhaps you are going for a dreamy look and you want it to be much lighter. It is possible to adjust your photo’s exposure using software like Photoshop. However, there are limits to that and you will most likely introduce a lot of unpleasant noise into your images. The goal then is to get your exposure dialed in as accurately as possible in camera.
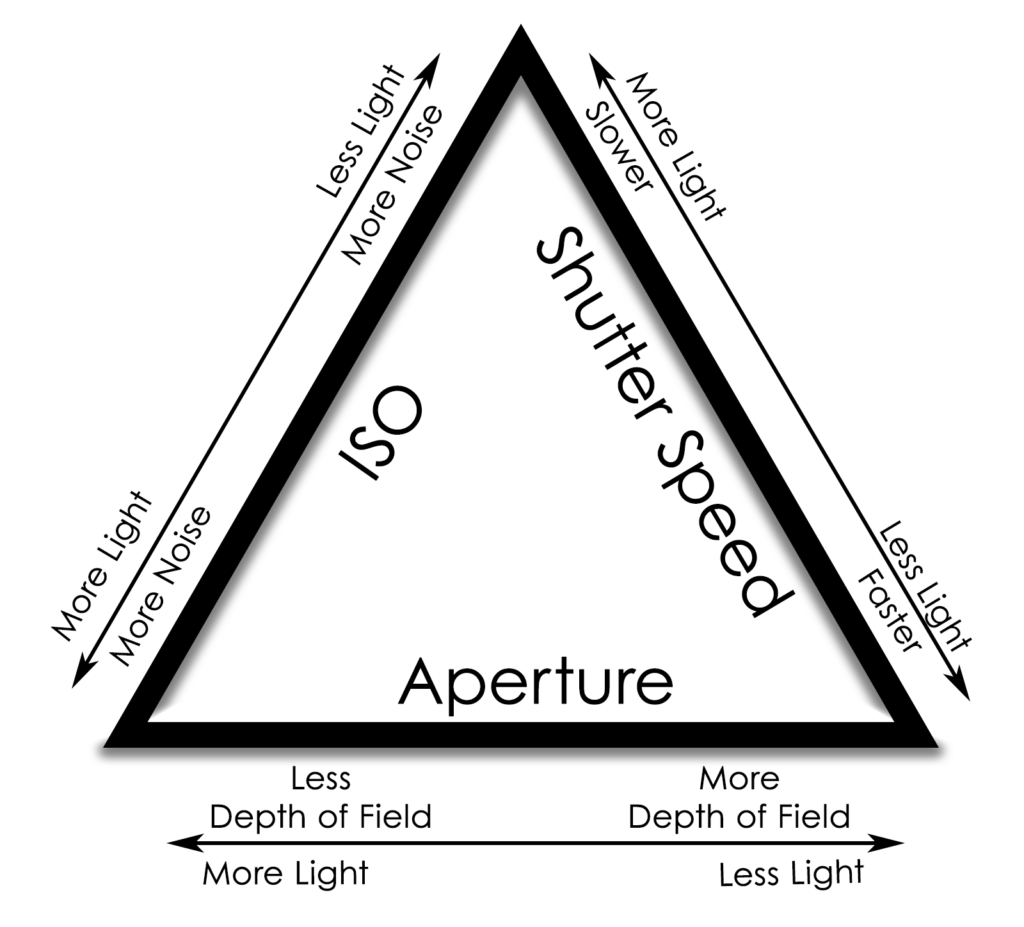
The Exposure Triangle Explained
Just in case anyone who cares about geometry is reading I have to acknowledge that this is not a triangle in any mathematical sense. It doesn’t really follow any of the properties of one. However the three values are interlinked. A change to any one of the three will require a change to at least one of the other two in order to balance out your exposure. Exposure Triangle sounds better doesn’t it? Let’s look at each of these elements in turn:
Shutter Speed
This is probably the most intuitively obvious of the three. It is quite simply how long your camera’s shutter stays open. The longer it stays open, the more light gets to your sensor. The more light, the brighter your image. Of course there’s a catch. Long shutter speeds, and in this case by long I mean anything longer than one hundredth of a second can cause problems.

Imagine that you’re trying to take a picture of something that moves fast like a bird or a car. While a hundredth of a second may seem like a very short time indeed the thing you’re trying to photograph will move quite a lot in that amount of time and the chances are your photograph will be little more than a blur. And while you can probably hold your camera steady for that amount of time, shutter speeds of a 60th of a second will probably suffer from camera shake as it’s hard to hold your hands completely steady.
For some types of photography this is less of a problem, particularly if you are using a tripod but it’s clear that adjusting shutter speed has it’s limitations. Which is why it’s fortunate we have other options as well.
Aperture
Every camera lens has an iris which performs a similar function to the iris in your eye. It opens and closes to let in more or less light as required. The range of aperture values for a lens depends on how it was engineered but is measured in “f-stops” with f standing for focal length. When we change the aperture of our lens not only do we increase or decrease the amount of light that gets to the sensor, we change the depth of field of our image.

Depth of field is a topic that deserves an entire article but to give you the edited highlights, when the f stop is low (say f1.7 or f2.2) the amount of light getting into the camera is high but the depth of field is narrow which means that most of the image will be out of focus. Conversely when the f-stop is high (say f11 or more) much less light is getting into the camera but the depth of field is much greater so more of your image will be in sharp focus. The image here illustrates that. Far more of the Roku remote is in focus when I use high f-stop than when I use a low one.
ISO
Our final element in the Exposure Triangle is ISO which is the most abstract of them all. In the days of film cameras, ISO reflected the type of film that was in your camera. Different types of film were engineered to be more or less sensitive to light. In the digital world things are a little different and now ISO is effectively a measure of how much the exposure is boosted in camera.

This sounds great. Why bother with those other two settings if you can just boost or reduce exposure via ISO? Well, you guessed it, there’s a catch. By boosting exposure via ISO settings you increase the amount of noise in your image. So a low ISO of say 100 or 200 will show no discernible noise in your image while an ISO of 1,600 or 3,200 will show a lot of noise.
The image here clearly shows the impact. The top part of the image was shot with an ISO of 200 while the bottom use 3,200. To get the full difference I turned off any noise reduction in my processing software.
A Delicate Balance

Since each of these settings has limits on it and we can’t simply crank one of them up to 11, the trick is to learn to balance them all against each other to minimize any noise or other negative impacts on your photo. Exactly how these three balance depends very much on the type of photo you are taking and the amount of light available to you at the time. Fortunately modern cameras are very good at adjusting these values for you.
When you are starting out it’s perfectly acceptable to let the camera pick the cameras for you but by doing that you are limiting your ability to make artistic decisions about what your photo will look like. So in the next article we will talk about how to take your camera off auto and run through a few different scenarios and what settings you might use.
Discover more from Veristopia
Subscribe to get the latest posts sent to your email.